Tutorials

  • Pumpkin Patch Quilt Block Tutorial

    Pumpkin Patch quilt block tutorial - How to make a pumpkin quilt block

    When it's fall, it's time for all things pumpkin. So let's make some adorable pumpkin patch quilt blocks! Warning though: these are totally addictive to make. And they come together quickly so you'll have lots of pumpkins in your pumpkin patch in no time!

    (Need fabric? Browse our selection of halloween fabric.)

    For each pumpkin block, you'll need to cut:

    • 1 - 8" x 7" rectangle for the pumpkin 
    • 1 - 2" x 3-1/2" rectangle for the pumpkin stem
    • 5 - 2" x 2" squares of background fabric 
    • 2 - 3-1/2" x 3-1/2" squares of background fabric

    Now let's get started!

    Pumpkin Quilt Block tutorial - step 1

    Step 1:

    We're working on our pumpkins first!

    You'll need the 8" x 7" rectangle and 4 of the 2" x 2" squares. Place the 2" squares RST (right sides together) at all 4 corners of the block, just like shown in the image above. Clip or pin in place.

    TIP: I like to fold my 2" squares on the diagonal to crease them so I know where to stitch in the next step. If you prefer a different technique, like marking it, using a stitch guide, or something else, by all means, use what works for you.

    Pumpkin quilt block tutorial - Stitch

    Step 2:

    Stitch along the diagonal creases for all 4 corner blocks. 

    TIP: I like to stitch just a wee bit to the outside of my crease lines to account for the width that my thread takes up. (I'm using a 3-ply 50wt thread.) This way, when I fold my corners back and press, the outer edges of my blocks will line up and not be short.

    Pumpkin quilt block tutorial - trim the corners

    Step 3:

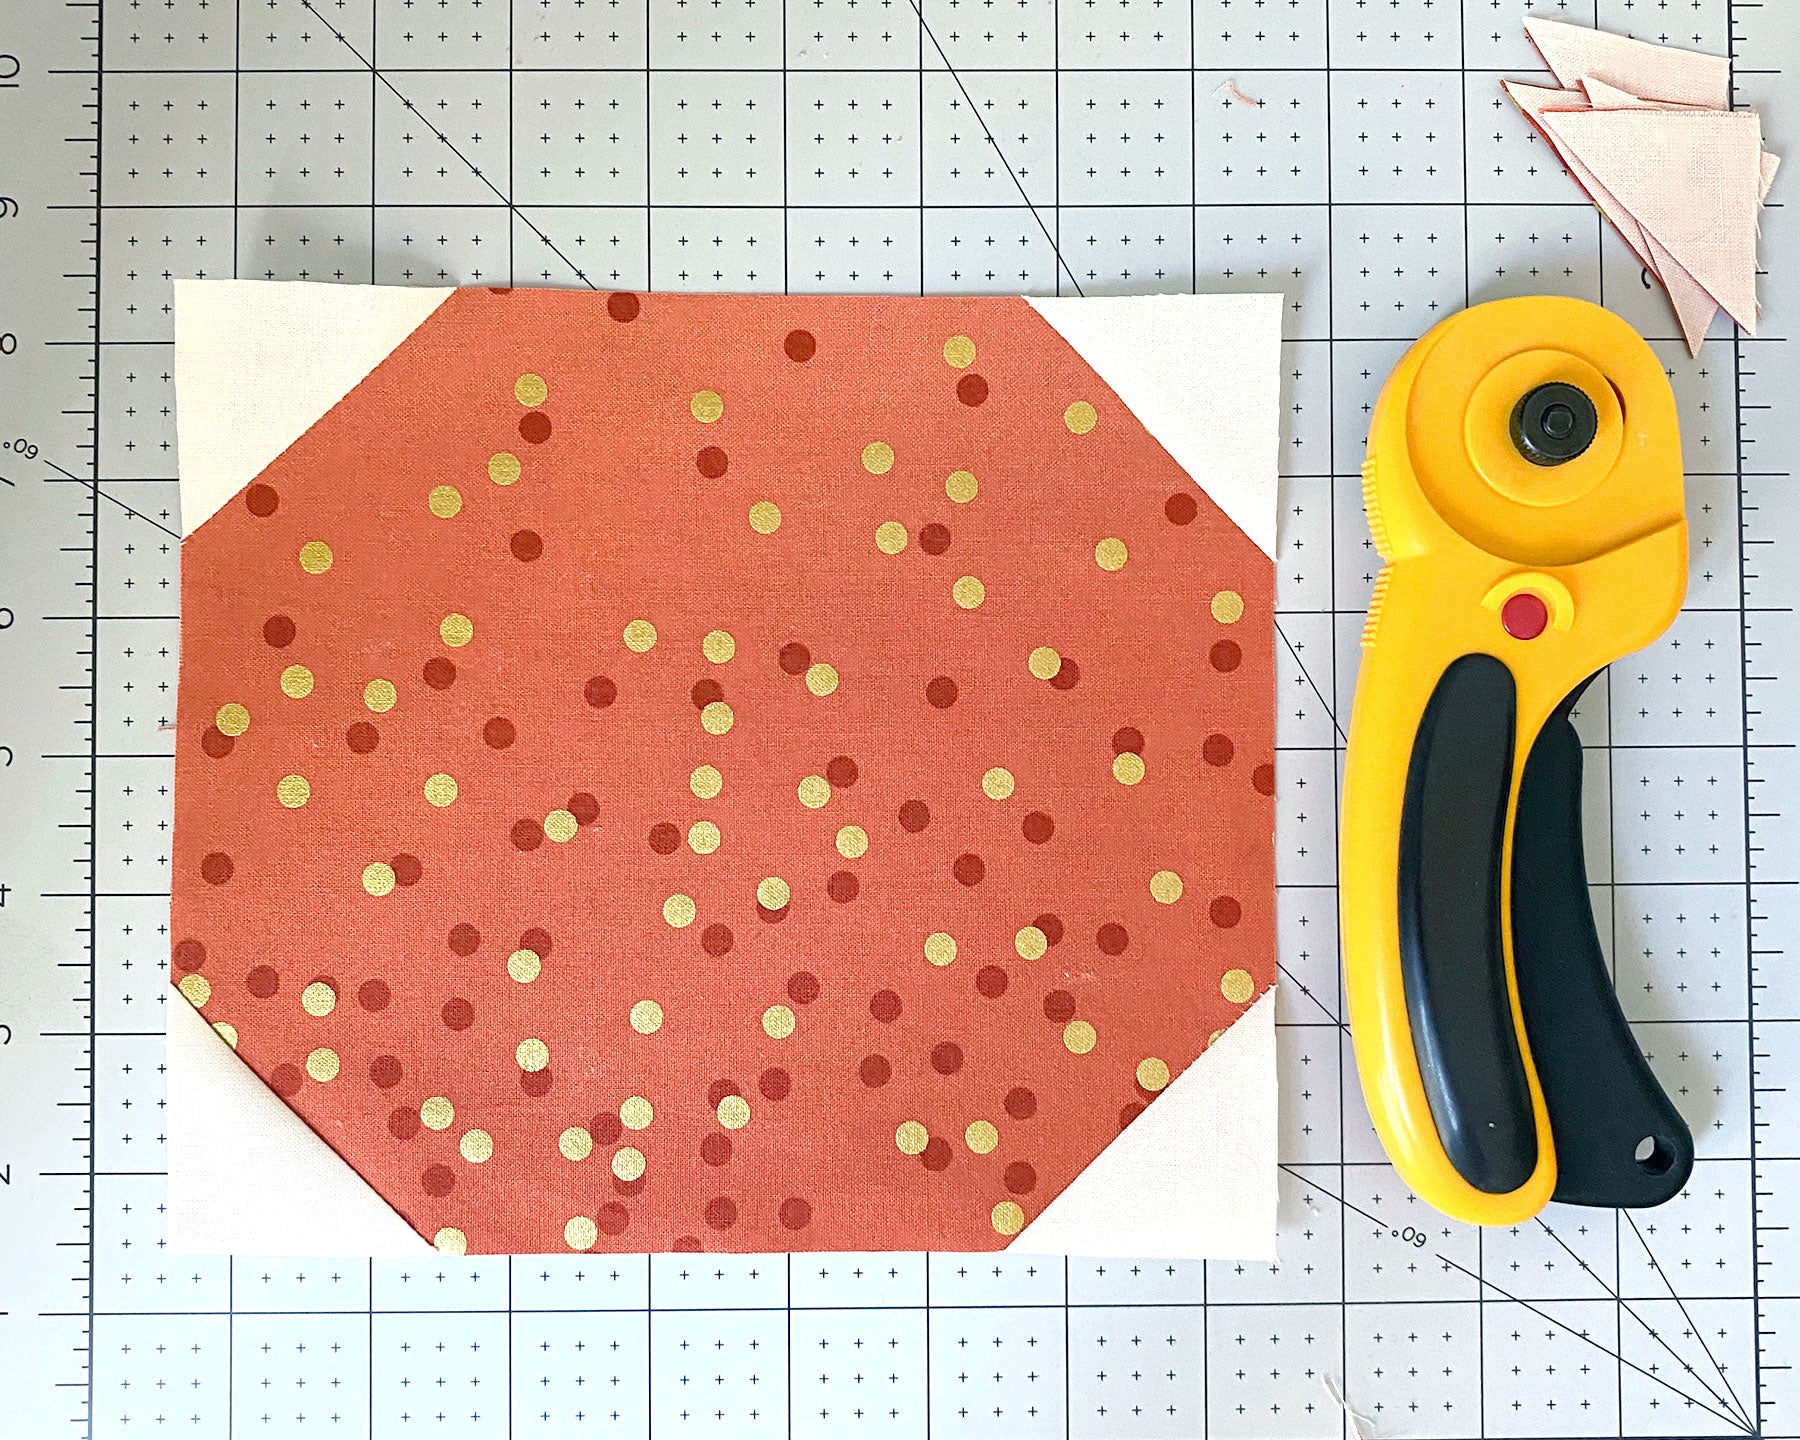
    Once you've got all 4 blocks sewn on, trim off the corners using 1/4" seam allowance. (You'll use your ruler and trim 1/4" away from your stitch line, just like shown above.)
    Pumpkin quilt block tutorial - press open

    Step 4:

    Press open the corners of your quilt block with an iron. Now you've got the bottom part of your pumpkin block! Easy, right?

    Pumpkin Quilt Block tutorial - stem

    Step 5:

    Now let's work on the stem. You'll need the last 2" x 2" square and the 2" x 3-1/2" rectangle. Place them RST along the top. 

    Again, I like to crease my square along the diagonal so I know where to stitch in the next step.

    Step 6:

    At your sewing machine, stitch along the diagonal line.

    Pumpkin Quilt Block tutorial - stem and trim

    Step 7:

    Trim the corner using a 1/4" seam allowance.

    Pumpkin Quilt Block tutorial - step 7

    Step 8:

    Using your iron, press the block open. (For these blocks, I pressed all my seams to one side. If you prefer to press seams open, that works, too!)

    Pumpkin Quilt Block tutorial - stem blocks

    Step 9:

    For this next step, we'll need the two 3-1/2" square blocks and the stem piece we just finished.

    Place 1 of the 3-1/2" square blocks RST with the stem piece, as shown above, lining up along the right edge. Clip or pin in place. At your sewing machine, sew using 1/4" seam allowance.

    Finger press open (which just means: use your fingers to press the 2 blocks open).

    Pumpkin Quilt Block tutorial - stem

    Step 10:

    Now, place the remaining 3-1/2" square block RST over the stem. Line the blocks up along the right edge, as shown in the image above. (I've lifted the top block back so you can see the stem block below. These are the edges we're lining up.)

    Clip or pin in place. At your sewing machine, sew a 1/4" seam allowance.

    Pumpkin Quilt Block tutorial - sew top and bottom pieces together

    Step 11:

    Now you have 2 assembled pieces, just like shown above. Take a moment and press your blocks flat with an iron.

    Let's get ready to sew these pieces together!

    Pumpkin Quilt Block tutorial - last step

    Step 12:

    Place the 2 assembled pieces RST, lining the stem and pumpkin edges like shown above. (If you used a directional print for the pumpkin, make sure you line up the correct edge.)

    Clip or pin in place and sew 1/4" seam along the edge.

    Press the block, with seams to 1 side. Then open up your block, and give it 1 more good press.

    Pumpkin Quilt Block tutorial - finished pumpkin quilt block

    And guess what?! You're done....

    Unless you want to make lots more. 🎃

    Pumpkin Patch Quilt Block

    Continue reading
  • How to sew a pretty perfect pencil pouch

    How to sew a pretty perfect pencil pouch

    This year, my third-grader needs a soft pencil pouch for class. So we’re saying goodbye to the hard plastic case and hello to something with a lot more personality. And even better? This is a quick project with pretty perfect results. In fact, I’ve already made 4! Let’s get sewing.

    Gather some supplies. In addition to the usual suspects (sewing machine, thread, scissors, rotary cutter, cutting mat, etc.), you’ll need:

    • 2 pieces for outer fabric, cut to 5″ x 10 ½”
    • 2 pieces for inner lining fabric, cut to 5″ x 10 ½”
    • 2 pieces of one-sided fusible fleece, cut to 4 ½” x 10″
    • 2 pieces of fabric, cut to 2″ x 2″ (this will cover the zipper ends, so you can choose the same fabric as your outer lining or an accent fabric like your inner lining)
    • 9″ zipper

    If you need a bit of fabric, find some ideas here.  (Note: I used fabric from Erica Hite’s Mouse Camp, which is out of stock.)

    THE HOW-TO

    Start by pressing your inner and outer fabrics to get everything nice and flat. I like using a spritz or two of Flatter. (It really does work, and also adds a little bit of stiffness.)

    zippered pencil pouch tutorial

    Next, center the fusible fleece on the wrong side of your outer fabric. Do this for both outer pieces.

    pencil pouch tutorial - how to make a zippered pouch

    Flip it over so the right side of the fabric is facing up and press the fleece to the fabric, following the manufacturer’s instructions for your fusible product. (You definitely don’t want to press the iron directly on the fusible fleece!)

    how to sew a zippered pencil pouch, a tutorial

    Now let’s start on the zipper. Don’t freak out! I promise it won’t be that bad. To start, we’re just going to lay it out along the top of the outer lining, like shown above.

    I’m using a 9″ metal zipper here. (You can use a nylon one if you prefer.) It’s worth noting that with zipper measurements, the length is measured from the top zipper stop to the bottom zipper stop, and is not the actual full length of the zipper tape from top to bottom.

    And that is why my 9″ zipper shown above is the same length as my 10 ½” wide pencil pouch.

    zippered pencil pouch tutorial

    Let’s fix that by trimming off the ends. For this zipper, I cut off about ¾” from each end. Note that my zipper stops are still in tact. Do not cut through those. (I’ve even left a little space after each stop, and you can do the same.)

    So now you’re thinking, “Oh my… Those zipper ends sure are unsightly.” And yes, they are. But we’re going to fix that, and these next few steps are going to give our finished zippered pencil pouch a very…ummm…finished look.

    how to sew a zippered pouch

    Take your 2″ x 2″ squares and fold them in half, as shown in the 1st picture above. Use your finger to press it and get a crease (like middle picture above). Next, fold in the ends toward the middle crease (shown in last picture). Now fold it all closed and give it a good press.

    how to sew a zippered pencil pouch tutorial

    Sandwich the zipper in between the folded tab. Do this for both ends of the zipper. Use a Wonder Clip to hold it in place.

    Since we’re using a metal zipper, we won’t be sewing a straight line across the tab and zipper teeth. Instead, we’ll stitch along both sides of the zipper. (See purple lines in 2nd picture above.) You don’t want to sew too close to the zipper, but you also don’t want to be right on the edge. Ultimately, this stitch will be hidden in the lining of the pencil pouch.

    zippered pouch sewing tutorial

    Once you’re done stitching, trim off the excess fabric on both sides. Now we’ve got pretty tabs on our zipper.

    zippered pencil pouch tutorial

    Let’s start sandwiching! Lay your outer fabric down, right side facing up. Lay your zipper down on top of it, right side facing down, lining it up along the top edge (first image above). Next, lay your inner lining fabric on top of the zipper, with right side facing down.

    zippered pencil pouch tutorial

    Wonder Clip the layers together, lining them up along the top, and stitch along the zipper edge using your machine’s zipper foot.

    (Tip: As you get closer to your zipper pull, it’ll become harder to sew a straight line. So stop when you get close, raise the zipper foot, leaving the needle down, and gently pull the zipper in the opposite direction from which you are sewing. It’ll be out of your way now and you can resume sewing in a straight line.)

    zippered pencil pouch tutorial

    There’s your 1st side!

    how to sew a zippered pencil pouch

    Now let’s give it a good press and move on to the next step.

    how to sew a zippered pencil bag

    Here we’re going to layer the entire pouch together. Start with the other outer fabric, right side up (a). Place the zipper piece on top, facing down (b). Finally, place the other inner lining fabric on top, right side down. Line up all layers along the top, Wonder Clip them together, and use your zipper foot to sew along the zipper edge.

    Once you’ve got it stitched, open it up and give the other side a good press.

    how to sew a zippered pencil bag tutorial by Bloomerie Fabrics

    Now let’s topstitch along the outer fabric to give everything a clean, finished look. This also helps keep the fabric out of the zipper’s path once it’s all done. Because, let’s face it: No one likes a snaggy zipper.

    how to sew a zippered pencil pouch

    Next, unzip the pouch a little over halfway and then open it up so that inner lining fabrics are right sides together (RST) and outer fabrics are RST (like shown above).

    how to sew a zippered pencil bag, tutorial by Bloomerie Fabrics

    Line up the edges all the way around, making sure you match up your side seams. Also, make sure the zipper teeth push up toward the inner lining. Use your Wonder Clips to hold everything in place.

    how to sew a zippered pencil pouch

    Sew all the way around using 1/4″ seam allowance, leaving a 2-3″ opening along the bottom of the lining fabric (like above). Clip your corners to reduce some of the bulk, being careful not to clip through the seam.

    how to sew a zippered pencil pouch tutorial

    Turn the pouch right side out through the opening and push out your corners. (You can reach through the opening in the lining to push the corners out on the outer fabric.) Once you’ve done that, press the pencil pouch with your iron and slip stitch the lining closed.

    how to sew a perfect zippered pencil pouch

    And now you have your very own pretty perfect pencil pouch!

    Continue reading